Browsing Category

Cooking Up the Magic at Home

Pineapple Cupcake Inspired by DOLE Whip Recipe

Cooking Up the Magic at Home By July 17, 2023 No Comments

It’s almost DOLE Whip Day! Last week we shared the Foodie Guide to DOLE Whip Day 2023, filled with treats around Disney Parks and beyond. Today we’re cooking up the magic by sharing a recipe for Pineapple Cupcakes inspired by DOLE Whip from Disney’s Contemporary Resort.

Our chefs created a delicious pineapple mousse-filled cupcake topped with pineapple buttercream and garnished with a cherry. Using yellow and white buttercream gives the cupcakes the look of the classic DOLE Whip swirl. They’re as delicious as they are cute, and the perfect way to celebrate DOLE Whip Day at home.

It’s time to share the recipe! Use your favorite yellow cupcake recipe or box mix for this recipe. If you have leftover pineapple mousse, it tastes great with graham crackers or as a fruit dip. It’s even delicious on its own!

PINEAPPLE CUPCAKES INSPIRED BY DOLE WHIP
Contempo Café, Disney’s Contemporary Resort
Makes 12 Cupcakes

PINEAPPLE MOUSSE

  • 1/2 cup heavy whipping cream
  • 1/3 cup whole milk
  • 3 tablespoons pineapple-flavored powdered gelatin

PINEAPPLE BUTTERCREAM

  • 1 tablespoon pineapple juice
  • 3 tablespoons pineapple-flavored powdered gelatin
  • 1/2 cup vegetable shortening
  • 1/2 cup unsalted butter, softened
  • 4 cups powdered sugar
  • 2 tablespoons whole milk

CUPCAKES

  • 12 vanilla cupcakes, from a favorite recipe or box mix
  • Yellow food coloring
  • Orange food coloring
  • 12 maraschino cherries

FOR PINEAPPLE MOUSSE:

  1. Whip heavy cream in the bowl of an electric mixer fitted with a whisk attachment until soft peaks form. Set aside.
  2. Heat milk in a small saucepan over medium heat until very hot, but not boiling. Whisk in gelatin and stir until dissolved. Remove from heat and cool for 10 minutes.
  3. Fold gelatin mixture into whipped cream until fully incorporated.
  4. Refrigerate for at least 4 hours, up to 2 days.

FOR PINEAPPLE BUTTERCREAM :

  1. Combine pineapple juice and gelatin in small bowl, stirring until gelatin is dissolved. Set aside.
  2. Cream shortening and softened butter in the bowl of an electric mixer fitted with a paddle attachment until fluffy.
  3. Add gelatin mixture and beat on medium speed until fully incorporated.
  4. Add powdered sugar, one cup at a time, and beat on low speed until fully mixed. Increase to medium speed and beat, scraping side of bowl as needed, until frosting is stiff.
  5. Add milk, one teaspoon at a time, until buttercream is light and fluffy.
  6. Divide buttercream in half and store in two airtight containers until readyto use.

FOR CUPCAKES:

  1. Using a 1-inch cookie cutter or apple corer, cut hole about 2/3 of the way down the center of each cupcake. Fill with reserved pineapple mousse. Using an offset spatula, remove any excess mousse from the top of the cupcake.
  2. Add a few drops of yellow and orange food coloring to one of the reserved pineapple buttercream containers until desired shade of yellow is achieved.
  3. Place white buttercream in a piping bag fitted with a star tip. Spoon yellow buttercream in a second piping bag fitted with a star tip of the same size.
  4. Pipe buttercream on cupcakes, alternating between yellow and white to create a soft-serve swirl look. Top with maraschino cherry.

Always use caution when handling sharp objects and hot contents. Please supervise children who are helping or nearby.
This recipe has been converted from a larger quantity in the restaurant kitchens. The flavor profile may vary from the restaurant’s version.

Share:

Cooking up the Magic: Celebrate National Cherry Day With Riviera Signature Cookie Recipe

Cooking Up the Magic at Home By July 14, 2023 No Comments

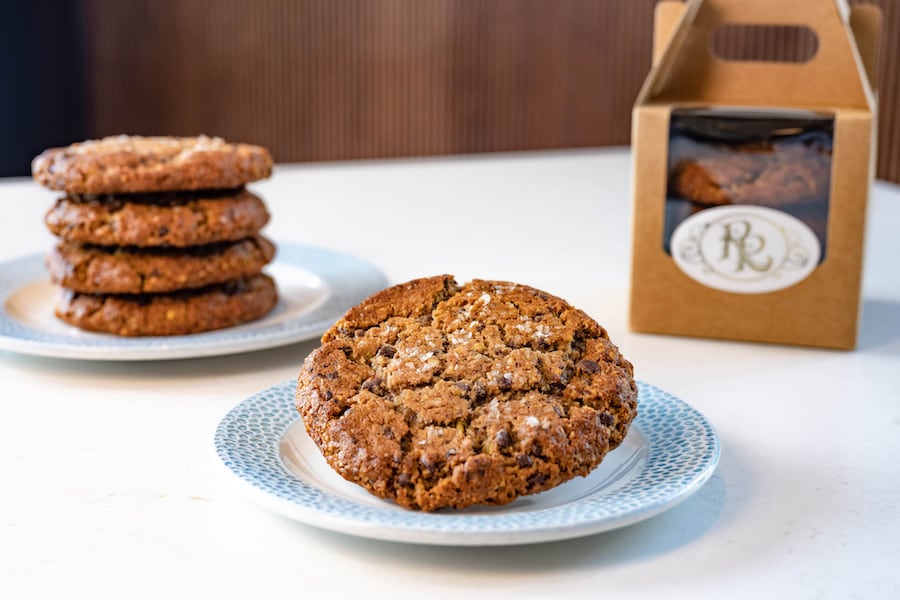
July 16 is 🍒National Cherry Day! Cherries are a favorite fruit … and a great dessert ingredients. To celebrate, we’re sharing a delicious Riviera Signature Cookie from Primo Piatto at Disney’s Riviera Resort, which contains dried cherries!

This was my first time testing (and eating) cookies with cherries. I’ve had plenty of cherry pies, cakes, cobblers, and crisps, but never cookies. I was definitely missing out on a great cookie ingredient. Since these cookies use dried cherries, we can enjoy them all year long.

In addition to dried cherries, these cookies are filled with semi-sweet chocolate, oats, molasses, walnuts, and pistachios. The ingredients come together to create a delicious cookie full of amazing flavors and textures. Finishing the cookies with sea salt flakes gives these cookies the perfect balance between salty and sweet.

Now that I’ve talked it up, here’s the recipe. This recipe makes a nice thick, soft cookie. See the cook’s note if you enjoy a thinner, crispier cookie. And don’t forget to download the recipe PDF too!

RIVIERA SIGNATURE COOKIE
Primo Piatto, Disney’s Riviera Resort

Makes 18-24 cookies

INGREDIENTS

  • 2 cups all-purpose flour
  • 1 teaspoon coarse salt
  • 3/4 teaspoon baking soda
  • 1/2 teaspoon baking powder
  • 2 1/4 cup oats, ground
  • 3/4 cup mini semi-sweet chocolate chips, ground
  • 1 cup unsalted butter, at room temperature
  • 1 1/4 cups brown sugar, packed
  • 1 cup sugar
  • 1 tablespoon molasses
  • 2 eggs
  • 1 teaspoon vanilla extract
  • 1 cup walnuts, finely chopped
  • 1 1/4 cup pistachios, finely chopped
  • 1 1/4 cup dried cherries, finely chopped
  • 1 1/4 cup mini semi-sweet chocolate chips
  • Sea salt flakes, to taste

DIRECTIONS:

  1. Preheat oven to 350°F. Line a baking sheet with a silicone baking mat or
    parchment paper; set aside.
  2. Sift flour, salt, baking soda, and baking powder in a large mixing bowl
    Stir in ground oats and ground chocolate chips; set aside.
  3. Cream butter, both sugars, and molasses in the bowl of an electric mixer
    fitted with a paddle attachment until fluffy.
  4. Add eggs, one at a time, and beat on low speed until fully incorporated.
    Add vanilla and beat, scraping the bowl as needed, for 1 minute.
  5. Add 1/3 of flour mixture and beat on low speed until just mixed. Continue
    with remaining flour. Add walnuts, pistachios, dried cherries, and mini
    chocolate chips and mix on low speed until fully incorporated into dough.
  6. Place six (1/4 cup) balls of dough on baking sheet. Flatten slightly and
    top with desired amount of sea salt flakes.
  7. Bake for 12 minutes. Cool for 2 minutes before moving to wire racks.
  8. Repeat with remaining dough.

Cook’s Note: For a thinner, crispier cookie, preheat oven to 375°F and bake for 7 minutes. Reduce heat to 350° and bake 3 additional minutes.

Always use caution when handling sharp objects and hot contents. Please supervise children who are helping or nearby.
This recipe has been converted from a larger quantity in the restaurant kitchens. The flavor profile may vary from the restaurant’s version.

Share:

Cooking up the Magic: White Corn and Mangalitsa Pork Arepas with Hogao Recipe

Cooking Up the Magic at Home By July 7, 2023 No Comments

Trying new foods is a great way to experience a country and its culture. If you’ve wanted to experience Colombia and all it has to offer, you’ll be excited to learn about the new Adventures by Disney trip to Colombia. This trip is an excellent introduction to the country’s fantastic food, friendly people, joyful music, and astonishing natural beauty. The country also served as inspiration for Walt Disney Animation Studios’ “Encanto,” which introduced us to Mirabel and the entire Madrigal family!

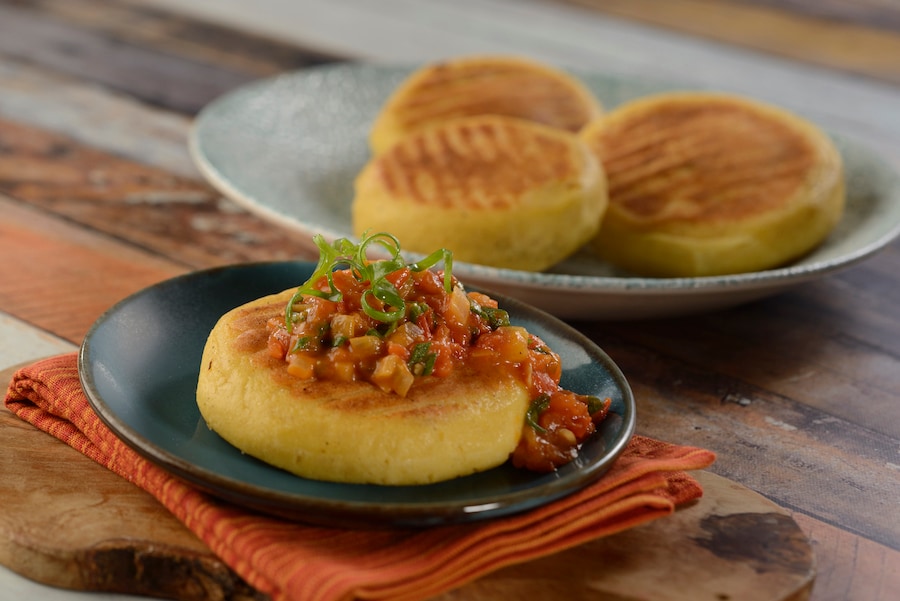
One of the highlights of the trip is the opportunity to learn to make arepas – a traditional Colombian dish – just like Julieta Madrigal, Mirabel’s mom, did for her family in the film. Just thinking about it made us hungry for arepas! So, we had to ask Colombian-born Disney Chef Danny Contreras for an arepa recipe – a favorite from the EPCOT International Food & Wine Festival recipe vault.

Arepas on plates

Arepas start with three simple ingredients: pre-cooked corn flour, water, and a little fat, such as butter, to bind the dough together. They can be made savory or sweet with meat or cheese. Chef Danny loves to make arepas with his daughter as a way to share his Colombian heritage. Chef Danny’s father was known for saying, “A meal without an arepa isn’t a complete meal.”

The recipe we have for you today is filled with pork rillettes, a cooking style for the pork, and topped with hogao, a Colombian tomato-based sauce with garlic and cumin.

Here is a delicious arepa recipe for you to get a taste of Colombia from your own home. Included on the recipe is artwork of Julieta, drawn specially for you by Disney Animation Supervisor Michael Woodside.

Download Full Size PDF of Recipe

Chef Danny recently chatted with Thomas Mazloum, president of Disney Signature Experiences, about arepas and the new Adventures by Disney trip to Colombia.

Share:

Alfajores Recipe for National Cookie Day

Cooking Up the Magic at Home By December 4, 2022 No Comments

It’s National Cookie Day – the perfect excuse to bake or eat cookies! And luckily, Disney parks all over the world have delicious cookies you can enjoy year-round, not just December 4. If you’re in search of a cookie recipe for today, we have a delicious Disney Eats surprise to share with you.

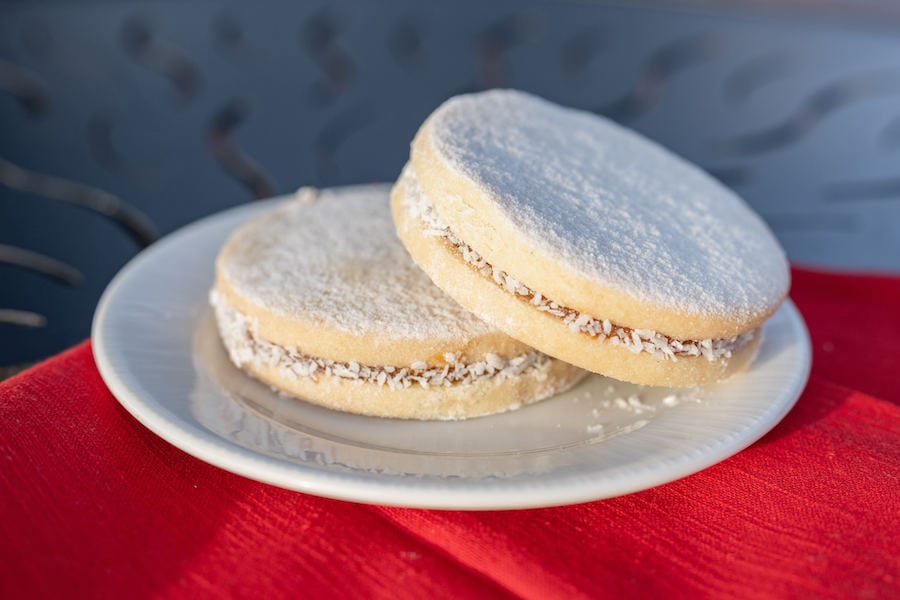
Alfajores from EPCOT

The EPCOT International Festival of the Holidays presented by AdventHealth runs through December 30 and has several delicious cookies and even a Cookie Stroll! The chefs shared the recipe for Alfajores at the all-new Nochebuena Cocina Holiday Kitchen with us. Alfajores are a vanilla shortbread sandwich cookie filled with dulce de leche and rolled in coconut.

Take the extra step and toast the coconut to get extra flavor from it. The vanilla shortbread is light and flavorful and pairs perfectly with the dulce de leche. The Alfajores were also easy to bake. This time of year is always busy, so you’ll appreciate an easy cookie recipe like this one.

Here is the recipe from our Disney Eats Cooking up the Magic series. We used store-bought dulce de leche for this recipe, but if you make your own, you can use that!

ALFAJORES (VANILLA SHORTBREAD COOKIES) from the EPCOT International Festival of the Holidays presented by AdventHealth
Makes 6-8 Alfajores

COOKIES

  • 2 cups all-purpose flour
  • 1/2 cup cornstarch
  • 3/4 cup butter, softened
  • 1/2 cup powdered sugar
  • 1 egg yolk
  • 1 tablespoon vanilla extract

ALFAJORES

  • 1 (14 ounce) can Dulce de Leche
  • 12-16 cookies
  • 1/2 cup shredded coconut
  • 1/4 cup powdered sugar

FOR COOKIES:

  1. Preheat oven to 325ºF. Line baking sheet with parchment paper; set aside.
  2. Combine all-purpose flour and cornstarch in a small bowl; set aside.
  3. Cream butter and powdered sugar in the bowl of an electric mixer fitted with a paddle attachment until fluffy. Add egg yolk and vanilla and mix on medium speed, scraping sides occasionally, until fully incorporated.
  4. Add reserved flour mixture and beat on low speed until dry dough starts to come together. Remove from bowl and knead of floured surface until dough is soft.
  5. Roll dough to 1/2-inch thickness. Cut into 2 1/2-inch circles. Place on prepared baking pan, leaving 2-inches between each cookie.
  6. Bake for 10-12 minutes, until lightly browned. Cool on wire racks.

FOR ALFAJORES:

  1. Pour dulce de leche into a piping bag.
  2. Place half of the cookies, bottom side up, on a flat surface. Pipe dulce de leche onto each cookie. Top with remaining cookies.
  3. Coat sides of cookies with shredded coconut and dust tops with powdered sugar.

Cook’s Note: To enhance the flavor of the coconut, toast it in the oven. Place on a baking sheet and bake at 300ºF, stirring every 3 minutes, until golden brown.

Always use caution when handling sharp objects and hot contents. Please supervise children who are helping or nearby.

This recipe has been converted from a larger quantity in the restaurant kitchens. The flavor profile may vary from the restaurant’s version.

Click here for a printable version of this recipe.

Share:

Disney Eats: Holiday Dinner Hot Dog Recipe

Cooking Up the Magic at Home By December 1, 2022 No Comments

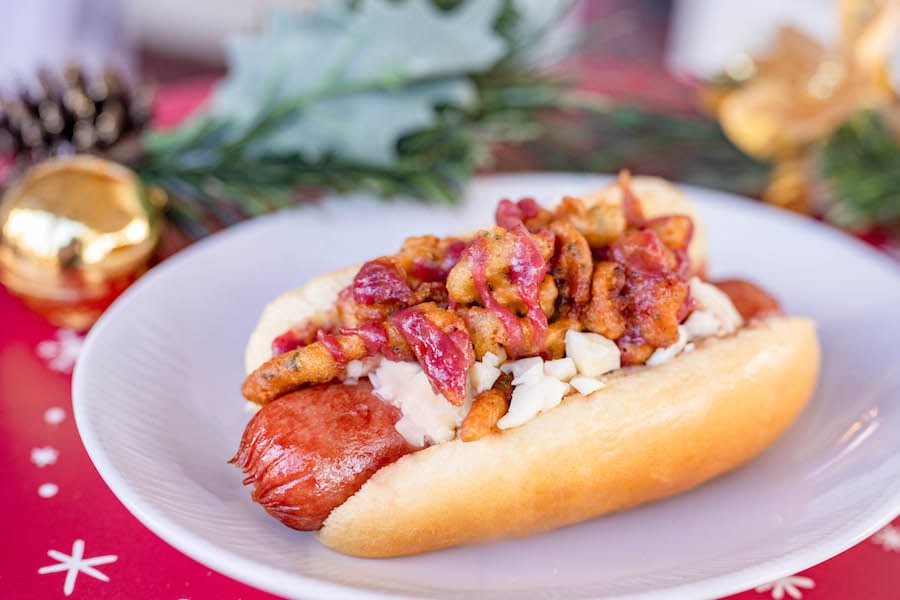
Disney guests always enjoy stopping at Casey’s Corner to taste the different specialty hot dogs. No matter the season or the celebration, there’s always a creative hot dog on the menu. Recently, the talented culinary team developed a delicious Holiday Dinner Hot Dog that will be on the menu through December 31. This hot dog features an all-beef hot dog with cranberry mustard, savory stuffing funnel cake, and cheese curds. If you’re a lover of both funnel cake and savory foods, you’re going to want to try this hot dog!

Holiday Dinner Hot Dog from Casey's Corner

This was such a fun recipe to test and eat! The savory stuffing funnel cake tastes just like stuffing. The cranberry mustard added a little bit of sweetness to this recipe without being overwhelming. I loved everything about this hot dog – and so did my taste testers and a lucky running partner who happened to be in the right place at the right time.

Here is the recipe for you to create this hot dog at home!

HOLIDAY DINNER HOT DOG

Casey’s Corner, Magic Kingdom Park
Serves 8

CRANBERRY MUSTARD

  • 1 cup cranberry sauce
  • 1 tablespoon Dijon mustard
  • 1/4 teaspoon water

SAVORY FUNNEL CAKE CRISPS

  • Oil, for frying
  • 1/3 cup milk
  • 1 egg
  • 1 tablespoon sugar
  • 1/2 teaspoon vanilla extract
  • 3/4 cup all-purpose flour
  • 1/2 teaspoon baking powder
  • 1/4 teaspoon salt
  • 1/2 teaspoon chicken bouillon powder
  • 1/4 teaspoon dried parsley
  • 1/8 teaspoon onion powder
  • 1/8 teaspoon garlic powder
  • 1/8 teaspoon dried sage
  • 1/8 teaspoon celery salt

HOT DOGS

  • 8 hot dog buns
  • 8 all-beef hot, cooked according to package instructions
  • Reserved funnel cake crisps
  • 8 ounces cheese curds, coarsely chopped
  • Reserved cranberry mustard
  • 1/2 teaspoon chicken bouillon powder

FOR CRANBERRY MUSTARD:

  1. Combine cranberry sauce, Dijon mustard, and water in a small mixing bowl. Whisk to combine until smooth.
  2. Transfer to a small squeeze bottle; refrigerate until ready to serve.

FOR SAVORY FUNNEL CAKE CRISPS:

  1. With caution, heat 2 inches of oil in a large frying pan or Dutch oven to 350ºF.
  2. Combine milk, egg, sugar, and vanilla in a medium bowl.
  3. In a separate bowl, whisk flour, baking powder, salt, chicken bouillon powder, dried parsley, onion powder, garlic powder, dried sage, and celery salt. Slowly stir into the milk mixture and mix until smooth. Transfer to a piping bag or squeeze bottle.
  4. Carefully hold piping bag or squeeze bottle above oil and squeeze half of the batter into the pan, using a swirling motion to create desired shape.
  5. Fry for 1-2 minutes, carefully flip with tongs and fry one additional minute. Remove from oil and drain on paper towels.
  6. Repeat with remaining batter.
  7. Cool for 5-10 minutes, then cut into 1-inch strips.

FOR HOT DOGS:

Place hot dog inside of bun. Top each hot dog with a few funnel cake strips, 1/4 cup of cheese curds, and 2 tablespoons cranberry mustard. Sprinkle with chicken bouillon powder.

Always use caution when handling sharp objects and hot contents. Please supervise children who are helping or nearby.

This recipe has been converted from a larger quantity in the restaurant kitchens. The flavor profile may vary from the restaurant’s version.

Click here for a printable version of the recipe!

If you make this hot dog at home or if you’re enjoying a hot dog at the parks, remember to tag #DisneyEats.

Share:

Cooking Up the Magic Plant-Based Spinach and Artichoke Dip Recipe

Cooking Up the Magic at Home By November 2, 2022 No Comments

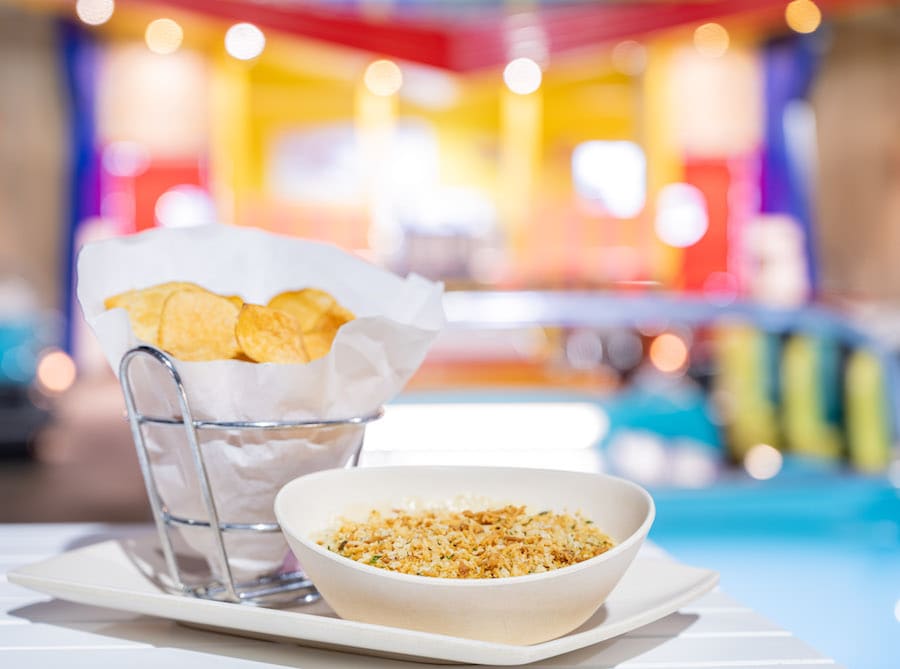
Happy World Vegan Day! Today, we’re celebrating this special day by sharing a delicious plant-based Spinach and Artichoke Dip recipe with you. This dip is served at Sci-Fi Dine-In Theater Restaurant at Disney’s Hollywood Studios and is made with plant-based cheese substitutes and oat milk and served with house-made chips. This delicious dish makes a wonderful appetizer to share with friends and family for any occasion.

I love the vegetables in this recipe – spinach, artichokes, red bell pepper, and cauliflower! The cauliflower blended with the plant-based cheese makes this dip nice and creamy. As a lover of spinach and artichoke dip myself, I can honestly say this is one of my favorites. If I hadn’t made it, I wouldn’t have known the cheeses were all plant-based.

When I tested this, I found there were extra cauliflower florets and red bell pepper left over, so I used them as dippers – and they were great! Tortilla chips, pita chips, and carrot sticks make fantastic dippers as well. One quick note for the home cook: plant-based cheese spreads, like the one used in the recipe, all have different water contents. Slowly add the oat milk to get the desired texture on your dip.

Plant-based Spinach and Artichoke Dip from Sci-Fi Dine-In Theater Restaurant

This is a great dish to bring to a gathering of plant-based friends and will also be enjoyed by friends who don’t follow a plant-based diet. Let’s get to the recipe!

PLANT-BASED SPINACH ARTICHOKE DIP
Sci-Fi Dine-In Theater Restaurant
Disney Hollywood Studios

Serves 4

PANKO TOPPING

  • 1 cup panko-style breadcrumbs
  • 1 cup grated plant-based Parmesan-style cheese substitute
  • 1 tablespoon freshly chopped parsley

PLANT-BASED SPINACH ARTICHOKE DIP

  • 1 tablespoon water
  • 1/4 cup chopped Spanish onion
  • 1/4 cup chopped cauliflower
  • 2 teaspoons canola oil
  • 1 teaspoon chopped garlic
  • 1 1/4 cups vegan chive cheese
  • Oat milk, as needed
  • 1 cup tightly packed baby spinach leaves
  • 1/2 cup chopped canned artichokes
  • 1/4 cup diced red bell pepper
  • 1 teaspoon Tajin seasoning

DIPPERS

  • Red pepper strips
  • Cauliflower florets
  • Carrot sticks
  • Pita chips

FOR PANKO TOPPING:

  1. Preheat oven to 350ºF. Line a baking sheet with parchment paper.
  2. Stir breadcrumbs and plant-based Parmesan-style cheese on baking sheet. Bake for 5-7 minutes, stirring once, until golden brown.
  3. Cool for 10 minutes. Add fresh parsley and set aside.

FOR PLANT-BASED SPINACH-ARTICHOKE DIP:

  1. Combine water, onion, and cauliflower in a small food processor. Purée until smooth; set aside.
  2. Heat canola oil in a small skillet over medium heat for 5 minutes. Add chopped garlic and puréed cauliflower and cook for 3 minutes. Add plant-based chive cheese and cook, stirring constantly for 5 minutes, until cheese is melted. If dip is too thick, add 1 tablespoon of oat milk at a time and thin to desired consistency.
  3. Add spinach, artichokes, and red bell pepper. Cook for 4-5 minutes, until spinach is wilted, and artichokes are warm. Season with Tajin.
  4. Keep warm until ready to serve.

TO SERVE:

Pour warm spinach-artichoke dip into a small bowl. Sprinkle panko topping on top and serve with vegetables and pita chips.

Always use caution when handling sharp objects and hot contents. Please supervise children who are helping or nearby.

This recipe has been converted from a larger quantity in the restaurant kitchens. The flavor profile may vary from the restaurant’s version.

If you’re enjoying a plant-based offering at a Walt Disney World Resort or making your own Disney Parks-inspired dish like this one, remember to share your photo with #DisneyEats. We love seeing all your own foodie adventures.

Don’t forget to follow @DisneyEats on Instagram and check out our new Disney Eats topics page!

Click here to download the recipe.

Share:

Cooking Up the Magic: Recipe for the Mouthwatering Pretzel Bread Pudding from EPCOT

Cooking Up the Magic at Home By October 17, 2022 No Comments

It’s finally fall in Florida!! While it may be a little different than it is in other parts of the country, fall in Florida is fun – especially at Walt Disney World Resort!

We all have our must-have treats at EPCOT. One of those treats is the Jumbo Pretzel from Sommerfest, but often find debating between sweet and savory treats at the parks. The Pretzel Bread Pudding is on the menu at this favorite spot and thankfully, the culinary team was willing to share the recipe.

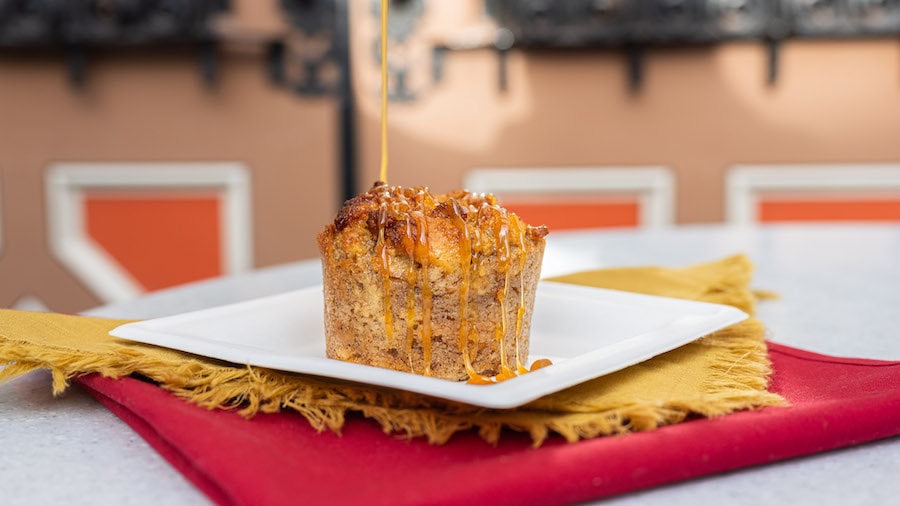
The Pretzel Bread Pudding features pieces of jumbo pretzels and is topped with house-made vanilla sauce and caramel. It’s the perfect dessert for anyone who loves the sweet and savory combination.

This dish was so fun to test. I love desserts that taste like they’re time-consuming but are actually easy to make, and this is one of those desserts. EPCOT uses the delicious Jumbo Pretzels they sell in the park to make this dessert, but I recreated this using pretzel bread that is easily found in grocery stores. I made the vanilla sauce and mixed up the Pretzel Bread Pudding in the morning, then baked it for dessert.  The taste testers all loved it warm, straight out of the oven. It also reheats well for breakfast the next morning (if you have any leftovers).

Now that I’ve talked about this amazing recipe, it’s time to share it with you. Be sure to plan ahead on this one because it needs to rest in the refrigerator for at least 4 hours so that the pretzel bread can fully absorb the liquid.

If you make this delicious dessert at home or have a chance to enjoy it at EPCOT, be sure to share and include #DisneyEats!

PRETZEL BREAD PUDDING

Sommerfest – EPCOT
Makes 15-18

VANILLA SAUCE

  • 1 egg
  • 1/4 cup sugar
  • 3/4 cup heavy cream
  • 1 cup milk, divided
  • 2 1/2 teaspoons cornstarch
  • 3/4 teaspoon vanilla extract

PRETZEL BREAD PUDDING

  • 1 pound pretzel bread
  • 1 cup milk
  • 1 2/3 cup heavy cream
  • 1 1/3 cups sugar
  • 4 eggs
  • 1 3/4 teaspoon vanilla paste
  • 1/2 teaspoon baking powder
  • 1/8 teaspoon cinnamon

TOPPING

Caramel sauce

FOR VANILLA SAUCE:

  1. Beat egg and sugar in small bowl. Set aside.
  2. Bring cream and 3/4 cup of milk to a simmer in a small saucepan over medium heat. Slowly add 1/3 of the simmering cream mixture to the eggs, whisking constantly to temper eggs. Carefully pour back into saucepan.
  3. Whisk cornstarch and remaining 1/4 cup of milk together in a small bowl. Add to saucepan. Cook over medium heat, stirring constantly until sauce thickens. Remove from heat and add vanilla extract.
  4. Place a mesh strainer over a bowl. Pour sauce through strainer and cool to room temperature.
  5. Cover and refrigerate up to 7 days.

FOR PRETZEL BREAD PUDDING:

  1. Tear or chop pretzel bread into large pieces. Place in a food processor and pulse until coarse crumbs form.
  2. Whisk milk, heavy cream, sugar, eggs, vanilla paste, baking powder, and cinnamon in a large bowl. Add pretzel bread pieces. Cover and refrigerate 4-12 hours.
  3. Preheat oven to 375°F. Spray 15 1/2 cup ramekins or muffin tins with non-stick cooking spray. Add 1/3 cup pretzel bread pudding mix into each ramekin or muffin tin. Bake for 25-30 minutes, until centers of pretzel bread puddings are firm.
  4. Cool for 5 minutes before removing from molds.

TO SERVE:

Remove vanilla sauce from refrigerator. Heat in small saucepan over medium-low heat until warm. Place warm pretzel bread puddings on small plates. Top each with 2-3 tablespoons vanilla sauce. Drizzle caramel on top.

Note: Always use caution when handling sharp objects and hot contents. Please supervise children who are helping or nearby. This recipe has been converted from a larger quantity in the restaurant kitchens. The flavor profile may vary from the restaurant’s version.

Share:

Cooking Up the Magic: Recipe for Almond Sweet Corn Cake

Cooking Up the Magic at Home By September 20, 2022 Tags: , , No Comments

Mickey’s Not-So-Scary Halloween Party is currently taking place at Magic Kingdom Park on select nights through Oct. 31. The talented culinary teams have created some delicious Halloween-themed treats and eats for the party, which can all be found in our Foodie Guide. One of the most intriguing menu items is the Almond Sweet Corn Cake from Pecos Bill’s Tall Tale Inn and Café.

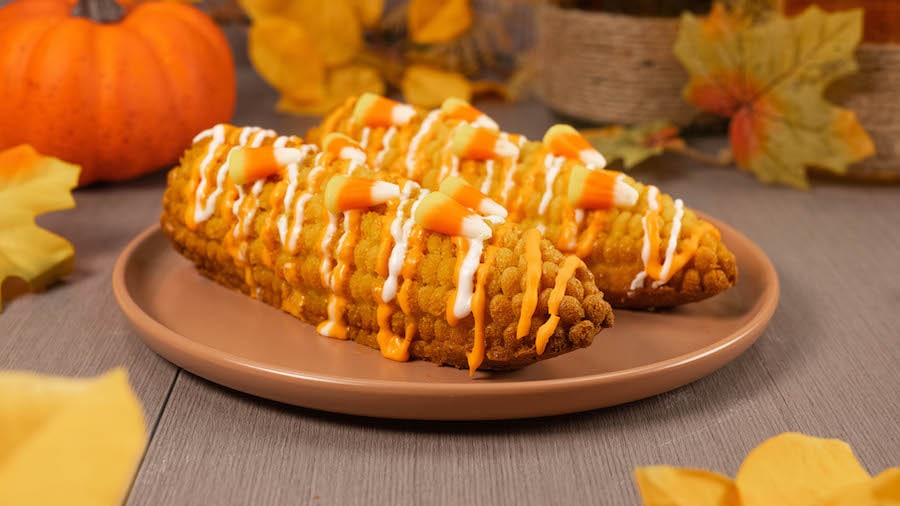
Upon first glance, you might ask yourself, “Is this cake or is it corn?” It really does look like corn on the cob! After testing (and tasting) this recipe, I can confirm that it is a dessert – and it’s a delicious one at that! The cake texture is perfect, it’s not too sweet and the subtle corn flavor pairs well with the brown butter to make a unique fall treat. Decorating the cake with white chocolate and candy corn makes this even more festive for the fall season!

It’s your lucky day because we’re sharing the recipe with you

It’s your lucky day because we’re sharing the recipe with you! Plan ahead on this one as the batter rests in the refrigerator for 8-12 hours to allow time for the flavors and texture to develop. The recipe calls for brown butter, which takes a few minutes longer than melting butter. The darker color and the nuttier, richer flavor of the brown butter are always worth the extra time it takes to make brown butter. Now, let’s get to the full recipe.

ALMOND SWEET CORN CAKE from Pecos Bill Tall Tale Inn & Cafe at Magic Kingdom Park
Makes 4 Cakes

ALMOND SWEET CORN CAKE

  • 10 tablespoons butter
  • 7 egg whites
  • 1/2 cup powdered sugar
  • 3/4 cup almond flour
  • 2/3 cup all-purpose flour
  • 3/4 teaspoon baking powder
  • 1/2 teaspoon salt
  • 2 teaspoons corn extract
  • 1 teaspoon yellow food coloring

TOPPING

  • 1 cup white chocolate melting discs
  • Yellow food coloring
  • Orange food coloring
  • Candy corn

FOR ALMOND SWEET CORN CAKE:

  1. Melt butter in small saucepan over medium-low heat, swirling occasionally for 5 minutes. Once butter foams and begins to brown, pour butter and solids into a small bowl. Cool for 15 minutes.
  2. Whip egg yolks in the bowl of an electric mixer fitted with a whisk attachment for 20 seconds; set aside.
  3. Combine powdered sugar, almond flour, all-purpose flour, baking powder, and salt in a mixing bowl and whisk to combine. Add reserved egg whites, corn extract, and yellow food coloring and whisk to combine. Stir in brown butter.
  4. Cover and refrigerate batter 8-12 hours before baking.
  5. Preheat oven to 400°F. Spread 1/2 cup batter into four 7.3-inch silicone corn molds. Place molds on baking sheet and bake for 45 minutes, or until a toothpick inserted in the center comes out clean. Cool for 5 minutes and remove from molds.
  6. Cool completely before decorating.

FOR TOPPING:

  1. Melt white chocolate in a microwave-safe bowl according to package instructions.
  2. Evenly divide melted white chocolate among 3 bowls. Leave one bowl white. Add desired amount of yellow and orange to remaining bowls to make yellow and orange icing to match candy corn.
  3. Drizzle each cooled cake with all 3 colors of white chocolate and decorate with candy corn.

NoteAlways use caution when handling sharp objects and hot contents. Please supervise children who are helping or nearby. This recipe has been converted from a larger quantity in restaurant kitchens. The flavor profile may vary from the restaurant’s version. 

The Almond Sweet Corn Cake is only available during Mickey’s Not-So-Scary Halloween Party. If you are not able to make it to the party, you can serve this dessert at your own fall or Halloween-themed party!

Click here for a printable version of this recipe.

Share:

Cooking Up the Magic: EPCOT Festival Recipe – Rocky Road Cake

Cooking Up the Magic at Home By August 23, 2022 Tags: No Comments

The EPCOT International Food & Wine Festival is in full gear! There are so many amazing foods to try. This year’s festival menus were filled with recipes to share with the home cook. One dessert that really stood out was the Rocky Road Cake at the Flavors from Fire Global Marketplace.

Favorite desserts to bake are ones that look time-consuming and difficult but are secretly easy to make. This Rocky Road Cake is a perfect example of that. The cake is delicious and does not take much more time than a standard chocolate cake. The individual cakes topped with marshmallows, almonds, and ganache really set this apart from an everyday chocolate cake. Rocky Road Cake is going on your list of desserts to make again…. and now it’s time to share the recipe!

ROCKY ROAD CAKE – EPCOT International Food & Wine Festival
Serves 8

SPICY SUGARED ALMONDS

  • 1/3 cup plus 1 teaspoon sugar, divided
  • 1/8 teaspoon cinnamon
  • 1/8 teaspoon ground cayenne
  • 3 tablespoons water
  • 3/4 cup unsalted almonds

CHOCOLATE GANACHE

  • 6 ounces dark chocolate, chopped
  • 2/3 cup heavy cream

CHOCOLATE-BUTTERMILK CAKE

  • 1 cup all-purpose flour
  • 1 cup granulated sugar
  • 1/4 cup unsweetened cocoa powder
  • 1 teaspoon baking soda
  • 1/2 teaspoon baking powder
  • 1/4 teaspoon salt
  • 1 egg
  • 1/2 cup vegetable oil
  • 1/2 cup buttermilk
  • 1/2 cup hot water

TOPPINGS

  • 1 cup mini marshmallows
  • Sea salt
  • Reserved chocolate ganache

FOR SPICY SUGARED ALMONDS:

  1. Line a baking sheet with parchment paper; set aside.
  2. Combine 1 teaspoon sugar with the cinnamon and cayenne in a small bowl; set aside.
  3. Stir remaining 1/3 cup sugar and water in a medium saucepan over medium-high heat until boiling. Carefully add almonds and stir frequently for 8-10 minutes, until water evaporates. Continue stirring for 2-3 minutes, until sugar begins to caramelize. Sprinkle cinnamon reserved mixture over almonds and stir to mix.
  4. Carefully pour almonds onto prepared baking sheet, separating with spatula.
  5. Cool completely, then coarsely chop. Store in airtight container up to 3 days.

FOR CHOCOLATE GANACHE:

  1. Spray eight 6-ounce ramekins with non-stick cooking spray; set aside.
  2. Place chopped chocolate in a medium glass bowl.
  3. Bring heavy cream to simmer in small saucepan over medium heat. Pour over chocolate. Let chocolate sit for 5 minutes, then stir until smooth.
  4. Place 1 1/2 tablespoons of ganache in each ramekin and refrigerate for 20 minutes.
  5. Keep remaining ganache at room temperature until ready to serve.

FOR CHOCOLATE-BUTTERMILK CAKE:

  1. Preheat oven to 350°F.
  2. In a large mixing bowl, whisk together flour, sugar, cocoa powder, baking soda, baking powder, and salt. Add egg, oil, and buttermilk. Whisk to combine. Carefully add boiling water and whisk until batter is smooth.
  3. Remove ramekins filled with ganache from refrigerator and fill each with 1/3 cup cake batter. Bake for 20-25 minutes, until a toothpick inserted in the center comes out clean.
  4. Cool 5-10 minutes before serving.

TO SERVE:

Carefully remove cakes from ramekins. Top each rock road cake with 2 tablespoons of mini marshmallows and 1 tablespoon of spicy-sweet almonds. Warm chocolate ganache in the microwave for 30 seconds on 50% power. Drizzle ganache over each cake and sprinkle with sea salt.

NoteAlways use caution when handling sharp objects and hot contents. Please supervise children who are helping or nearby. This recipe has been converted from a larger quantity in restaurant kitchens. The flavor profile may vary from the restaurant’s version. 

Click here for a print-at-home version of this recipe!

Tiana-themed kitchenware

Since it’s World Princess Week, we want to celebrate with Tiana- the princess who loves to cook.  The EPCOT International Food & Wine Festival Princess Tiana Collection recently debuted with an assortment of Tiana-themed kitchenware and apparel. To add a little extra magic, pick up some of the Tiana-inspired merchandise and enjoy using it while baking or displaying your Rocky Road Cakes.

Share:

Cooking Up The Magic: Famous Fried Chicken Recipe from Hoop-Dee-Doo Musical Revue

Cooking Up the Magic at Home By July 13, 2022 No Comments

When you think of comfort food,  does fried chicken immediately comes to mind? The talented culinary team at Hoop-Dee-Doo Musical Revue was kind enough to share their fried chicken recipe. This popular dinner show reopened last month, bringing back some favorite menu items, including fried chicken. “Our team was so excited to get back in the kitchen and whip up our beloved fried chicken once again,” Julie Hrywnak, chef at Disney’s Fort Wilderness Resort and Campground, said. “They really bring the culinary magic to the whole experience and enjoy the guests’ smiles and the energy in the room when the fried chicken is presented to the tables during the show.”

Julie Hrywnak, chef at Disney’s Fort Wilderness Resort and Campground

Over 800 pounds of fried chicken is prepared by the cast each night for the Hoop-Dee-Doo Musical Revue dinner show and teams from entertainment to food and beverage work together to keep guests entertained and fed.

Famous Fried Chicken from Hoop-Dee-Doo Musical Revue

How do they make sure they bring out the star of the meal at exactly the right time? They listen for its cue of course! In fact, the music of the show runs through the kitchen speaker so the cast knows the exact timing in the show to plate the food and send it out to our hungry guests. “Our cast love to sing along to the show as they prepare the country feast,” chef Julie said. “And the fried chicken is definitely a guest favorite that keeps them coming back for more!”

Chef Julie shared her top tips for making fried chicken with us:

  • Don’t over-bread the chicken, all it needs is one really good coat
  • Make sure your oil is between 325-350 degrees to get the chicken nice and crispy
  • Have fun with it! Fried chicken is a comfort food and is meant to be enjoyed!

Here is our recipe to help you celebrate! Call up a few friends or family members and offer them some of this delicious fried chicken — if they bring a few side dishes to share.

Famous Fried Chicken from Hoop-Dee-Doo Musical Revue
Serves 4

BRINE

  • 3 cups cold water
  • 2 tablespoons garlic powder
  • 4 tablespoons coarse salt
  • 1 medium chicken, cut into 2 legs, 2 breasts, 2 thighs, and 2 wings

FRIED CHICKEN

  • Canola oil, for frying
  • Reserved brined chicken
  • 3 cups all-purpose flour
  • 1 cup cornstarch
  • 1 tablespoon coarse salt
  • 1 tablespoon paprika
  • 1 tablespoon onion powder
  • 2 teaspoons ground white pepper

FOR BRINE:

  1. Combine cold water, garlic powder, and coarse salt in a large glass bowl. Add cut up chicken.
  2. Cover and refrigerate for 8 hours.

FOR FRIED CHICKEN:

  1. With caution, heat 3 inches of oil in a heavy-bottomed pot until it reaches 350°F.
  2. Remove chicken from brine and pat dry.
  3. Whisk flour, cornstarch, salt, paprika, onion powder, and white pepper in a shallow bowl or pie plate. Dredge chicken in seasoned flour, making sure to fully coat each piece.
  4. Carefully place chicken in hot oil, working in batches if necessary. Cook chicken, turning once, 13-14 minutes for breasts, 9-10 minutes for thighs, 7-8 minutes for legs and wings, until all meat reaches an internal temperature of 165°F.
  5. Carefully remove from oil and drain on paper towels.

Always use caution when handling sharp objects and hot contents.
Please supervise children who are helping or nearby.

This recipe has been converted from a larger quantity in the restaurant kitchens.
The flavor profile may vary from the restaurant’s version.
Be sure to download the recipe here!

Share: